
Pattern Review
It’s obvious why this pattern is a best seller from creator Birds and Crickets. Add a touch of cuteness and whimsy to your baby’s nursery, or work one up to give as a heartfelt gift. The range of pastel colors make it a perfect gender neutral baby mobile. The Crochet Hot Air Balloon Mobile is a sweet stunner that is fun to make, and is an impressive addition to your crochet portfolio. Read on to learn more about my experience with creating this project, and what you can expect if you decide to create one as well.
My Experience
I was sent the link to this pattern by a good friend of mine, who asked if I thought I would be able to make it. Her sister-in-law’s baby shower was coming up, and having chosen decor with an animal theme for the nursery, she thought this would be the perfect thing to complete the room for her.
Just by looking at the picture, I could tell that this project was going to be somewhat of a challenge. Amigurumi is not my strongest suit and it seemed like there were a lot of little pieces to make, which meant it would require a little more focus and attention than a typical crochet project, like an afghan, would. I was slightly intimidated. It’s easy to mess up projects that are so petite and detailed. Small mistakes, like a slightly too large or small eye, can throw off the scale of the piece and make it look wonky.
Still, I jumped at the opportunity. None of our friends or family have kids – I rarely get the chance to make something so stinking cute! I was not depriving myself of this!

Getting Started & Project Prep
I would recommend this pattern for an intermediate or advanced crocheter looking for a little bit of a challenge. This project uses basic stitches, as with any amigurumi, but there are certain elements that may prove to be difficult for a beginner crochteter.
For this project you will need:
- 3mm hook
- 4mm safety eyes OR small black glass beads (8)
- Styrofoam balls (4)
- 10” wooden frame
- Ring to hang mobile
- Fiberfill
- Optional Fabric starch
- Yarn – 10 colors
- What I used: 1 skein each Lion Brand Truboo in the colors Tangerine, Mushroom (purple), Celery, Yellow, Mint, Tan, Silver, Light Pink, and 2 skeins of white. 1 skein Lion Brand Beautiful You in the color Meteorite (black).
This pattern recommends using “yarn that calls for a 3mm hook.” I had trouble figuring out exactly what that meant, so I just went with a lightweight yarn (3) and it worked perfectly.
The pattern requires 10 different colors of yarn. I chose to use Lion Brand Truboo yarn because it has the largest variety of pastel colors while being correct weight for this project. The only issue with this yarn that I discovered is that it splits SO easy. The color black is not carried in the Truboo line, so for that I used Lion Brand Beautiful You, in the color Meteorite. It has a slightly bumpy texture that I initially worried was going to look odd, but it actually added some nice detail to the zebra! You will need one skein of each color, except for White. You will need two of those. These are the colors I chose:
- Tangerine
- Mushroom (purple)
- Celery
- Yellow
- Mint
- Tan
- Silver
- Light Pink
- White
- Meteorite (black)
If you have trouble finding a 10″ wooden frame (like I did) just find the closest size embroidery hoop, and use the inner ring as your frame. Amazon also has multi-packs of wooden frames available. I don’t recommend using a metal hoop, as the stitches that you make around it will slide around and make it very difficult for attaching and assembling your final piece.
The pattern also calls for styrofoam balls that are 3.15 inches in diameter to fill the balloons and make them nice and round. Again, I could not find the exact size that was called for, but I did find this pack of six 2.8 inch balls which worked perfectly.
For the ring that holds up the mobile, I found this multi-pack of plastic rings. I had some fiberfill and eyes leftover from a project I made awhile ago, so luckily I didn’t have to purchase those. I like to buy my fiberfill and eyes in bulk on Amazon so that I always have some on hand. This is my go-to filling, and this is a great set of safety eyes that come in various sizes for a wide range of projects. This pattern calls for eyes that are 4mm in diameter, but if you don’t have safety eyes you can attach small black glass beads instead.
Once I had all my supplies together I loaded them into my project box. This is my go-to carry case, especially when I’m working on projects with a lot of pieces. It’s nice and deep so there is plenty of room for keeping larger items, and it has a nifty tray with little compartments that sits right in the top (perfect for stitch markers and tapestry needles).
All that was left to do was to restart Gilmore Girls from Season 1, and get to work!
Making the Project
Just by looking at the picture, I could tell this project was going to be somewhat of a challenge. There are lots of small pieces to this pattern, and usually that means it will require a little more focus and attention than a typical crochet project, like an afghan, would.
I was confident going in, albeit slightly intimidated by making the animals. They are so small, and when you work on something that little small mistakes can really stand out. An eye, or any other detail that’s just slightly too big or too small, can throw off the scale of the whole thing and make it look wonky.
Working on a project like this is very different than working on something like an afghan. Where normally you can lose yourself in the meditative rhythm of crocheting a larger piece, a project like this mobile requires focus. You are working with tiny, tight stitches, and it is very important to keep count. It is not easy to hide being off by one or two stitches in this pattern, especially when it comes to the swirl pattern on the balloon. You also will end up with a lot of little pieces at the end that need to be assembled. If you are not a fan of stitching things together with a needle and thread, this may not be the project for you.
This pattern is written in the order that you should make the pieces. So I recommend starting at the beginning with the balloons.
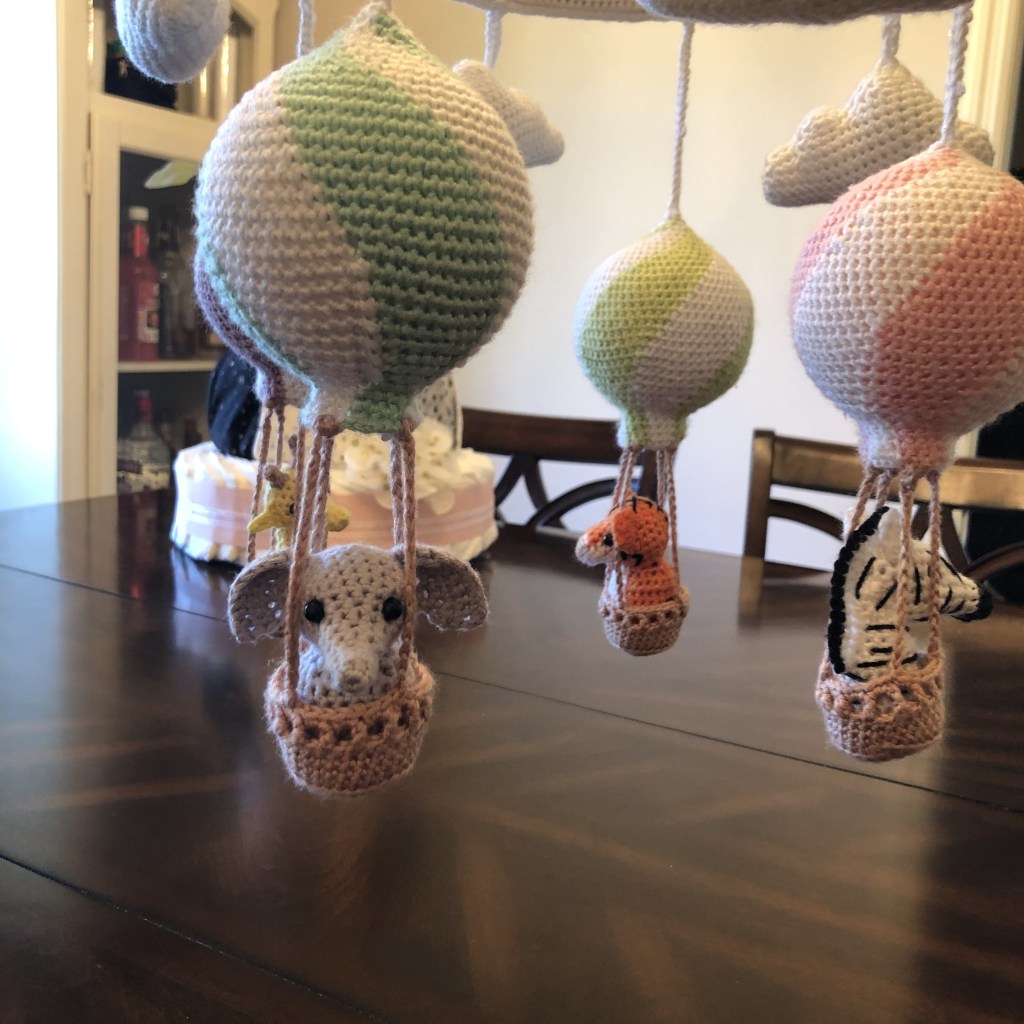
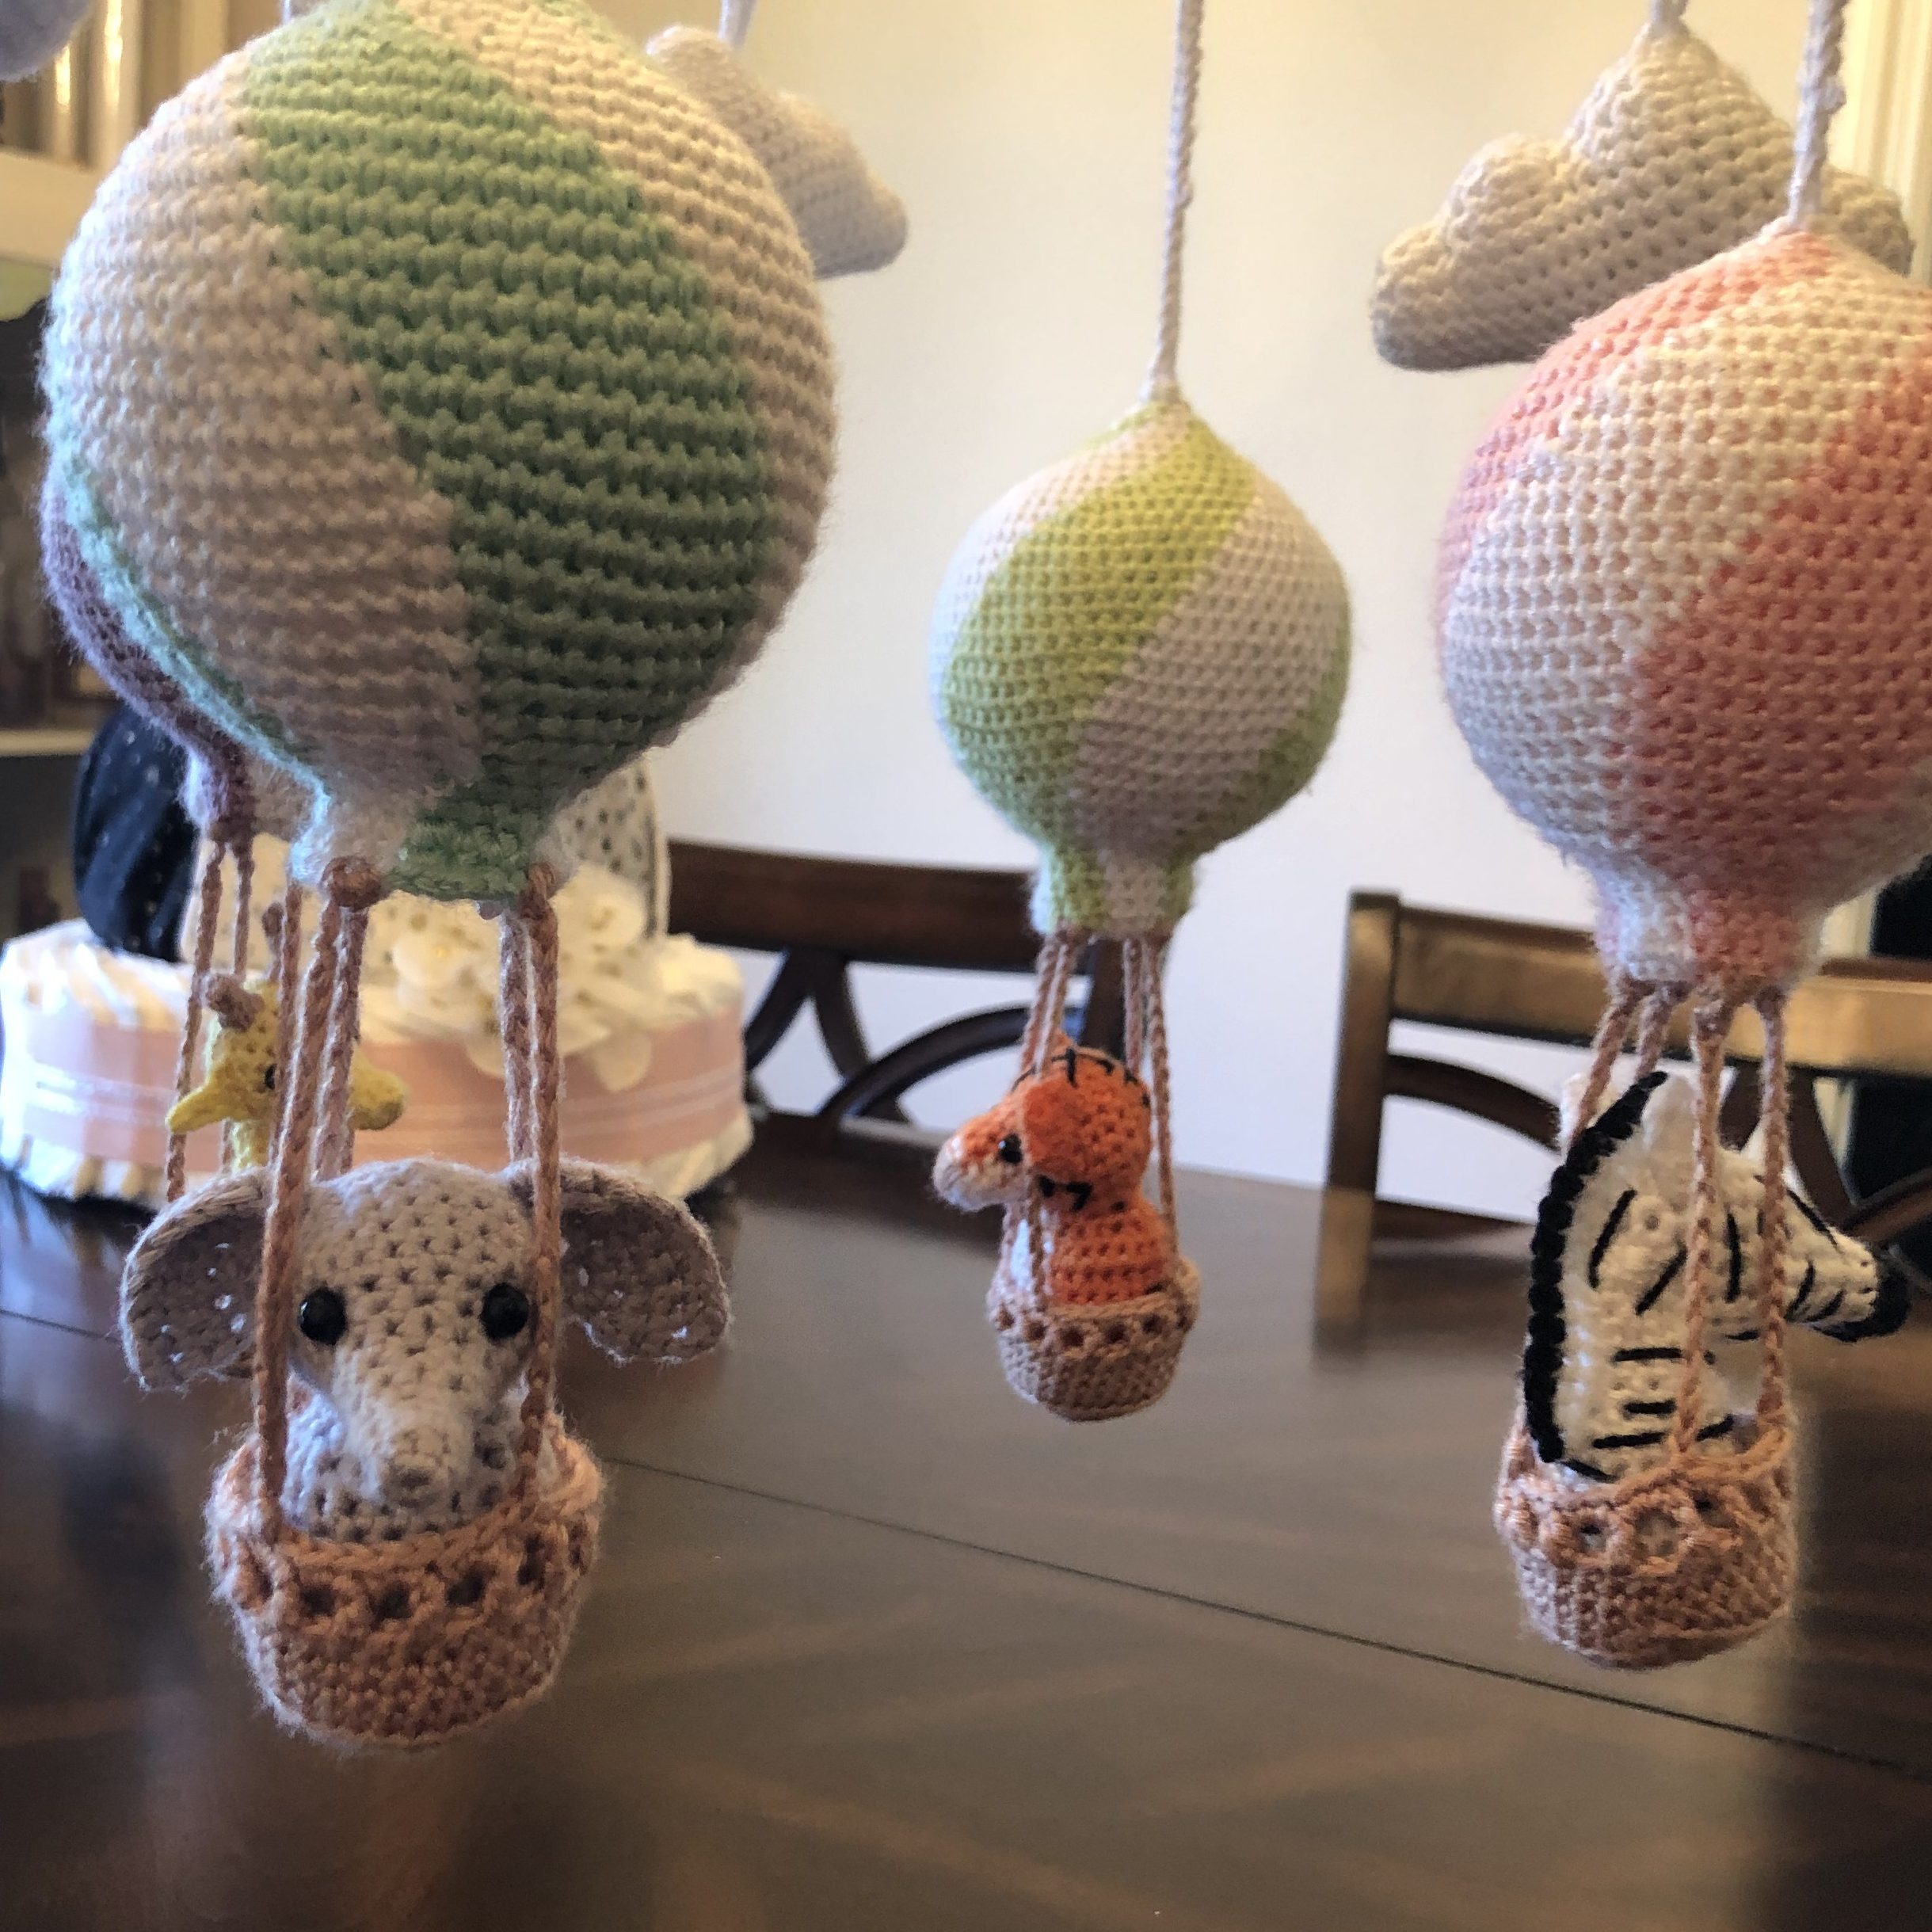
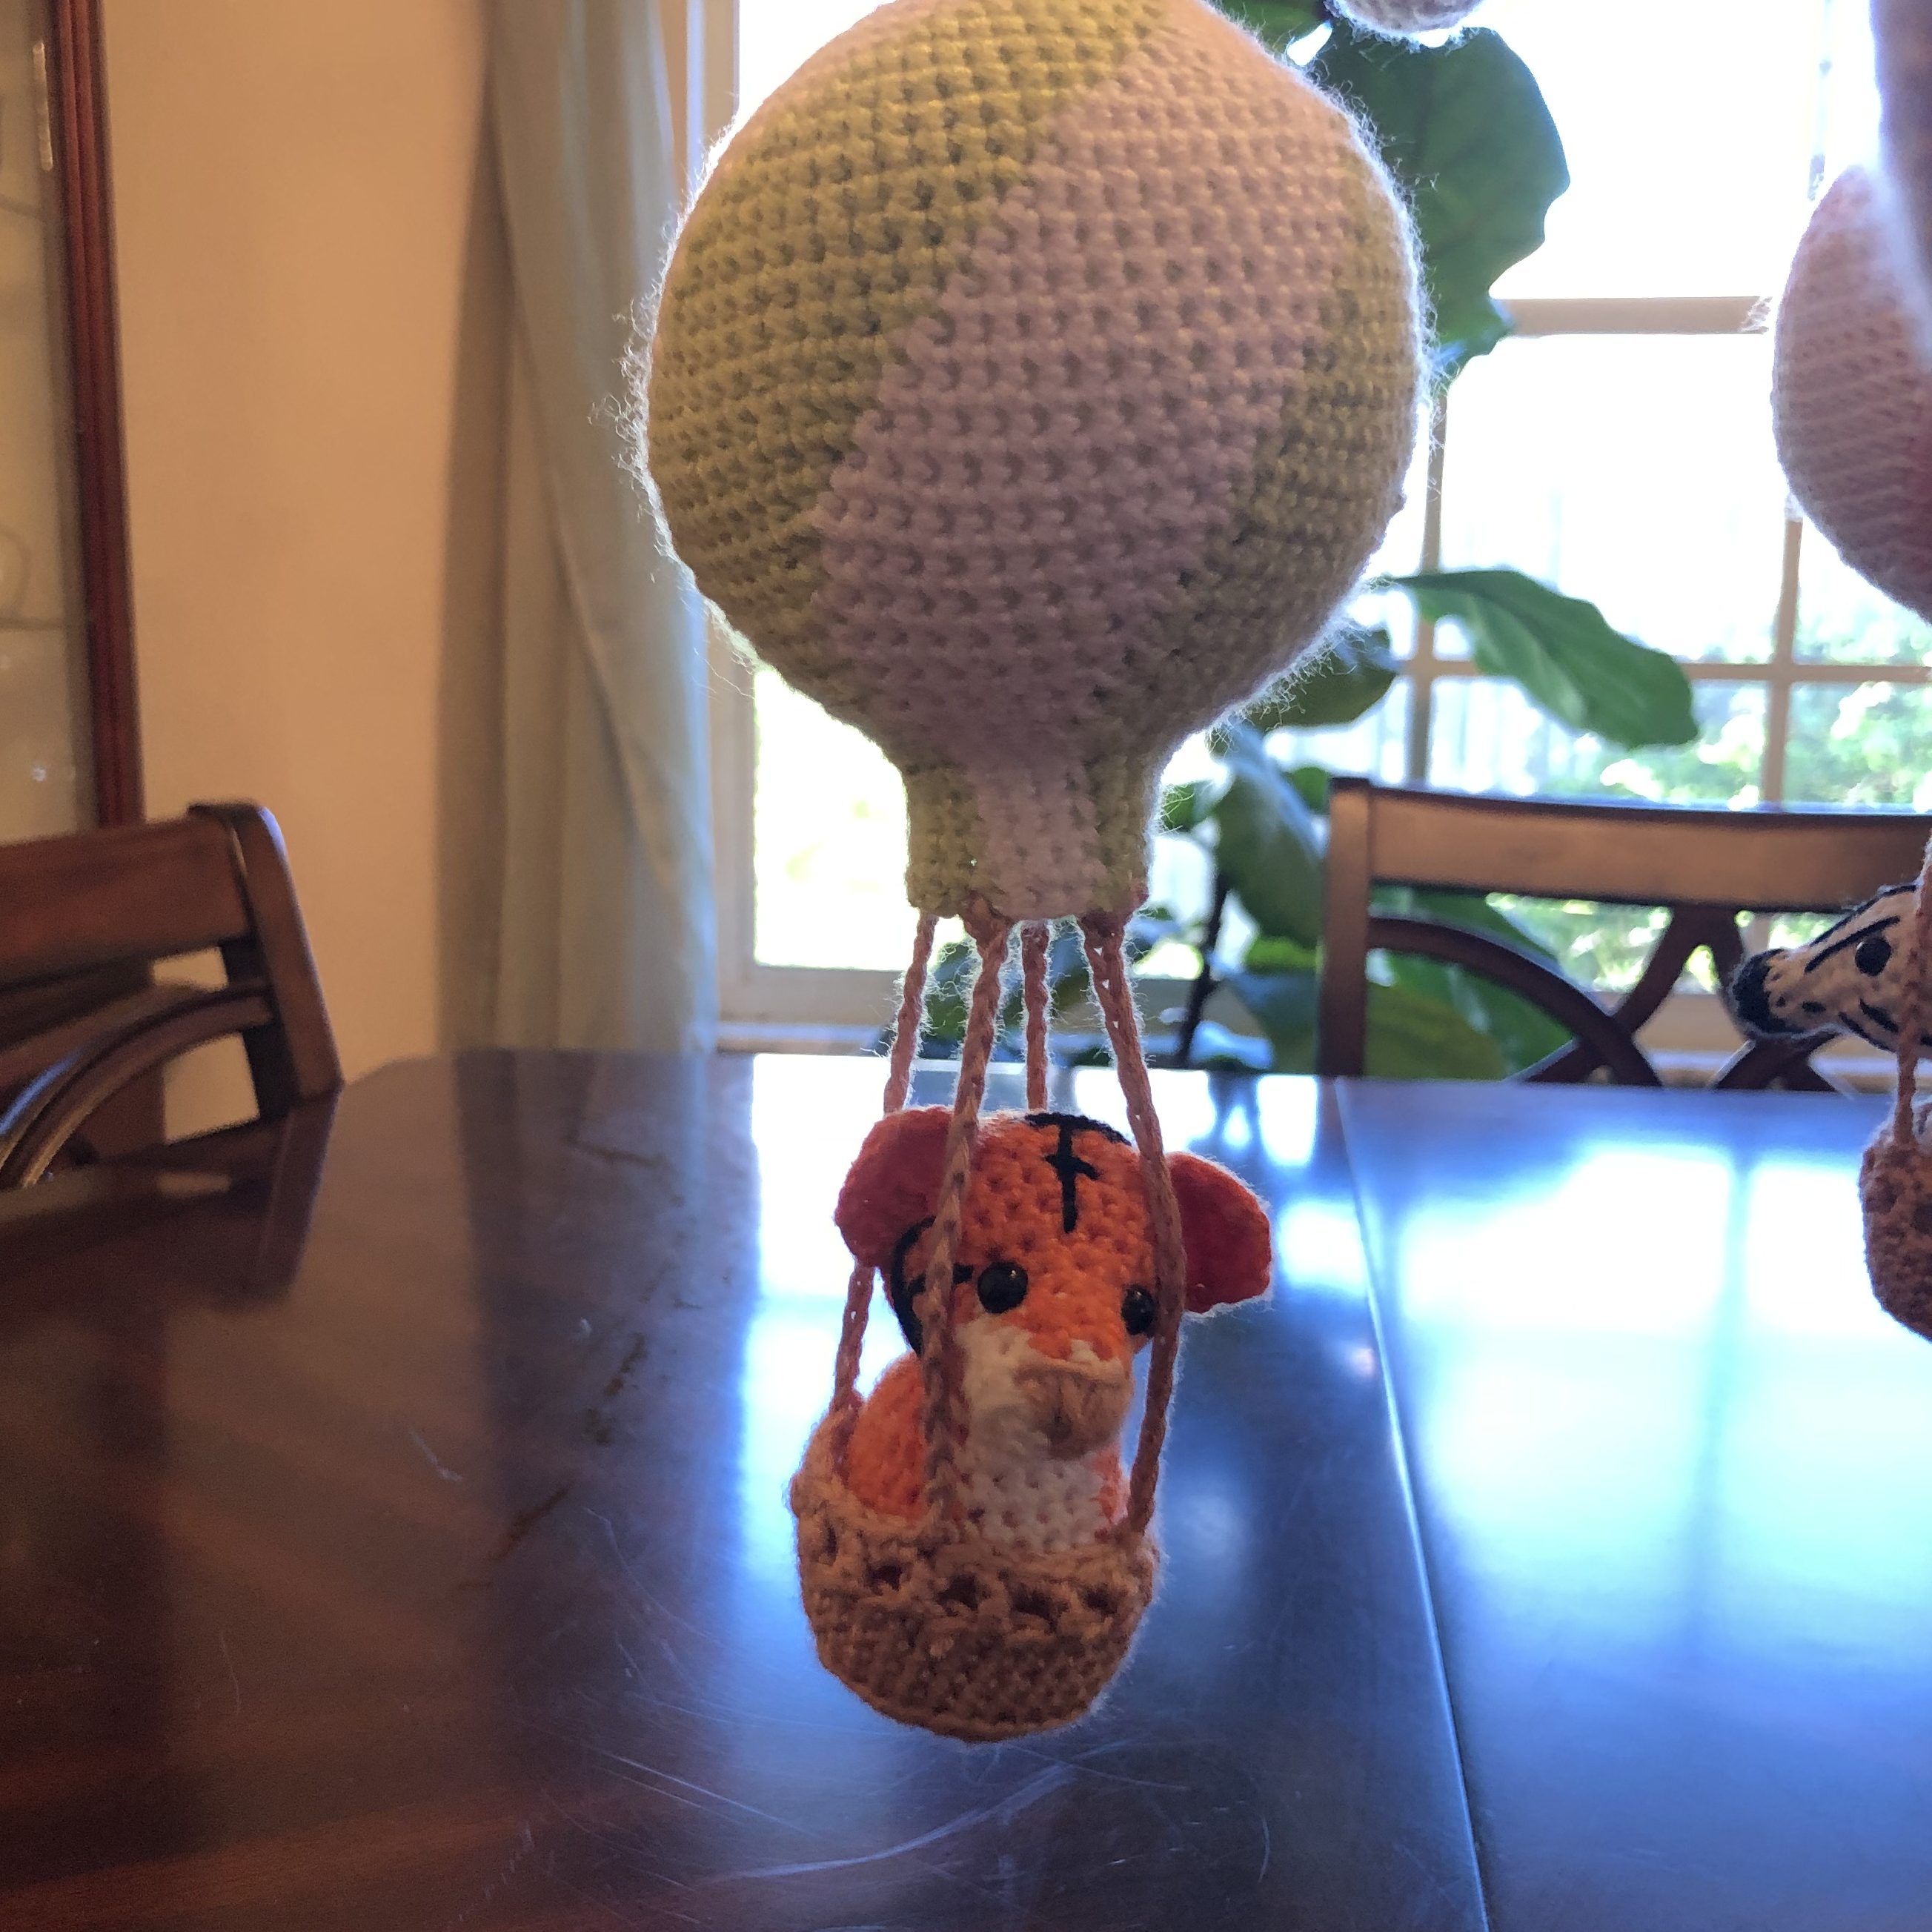
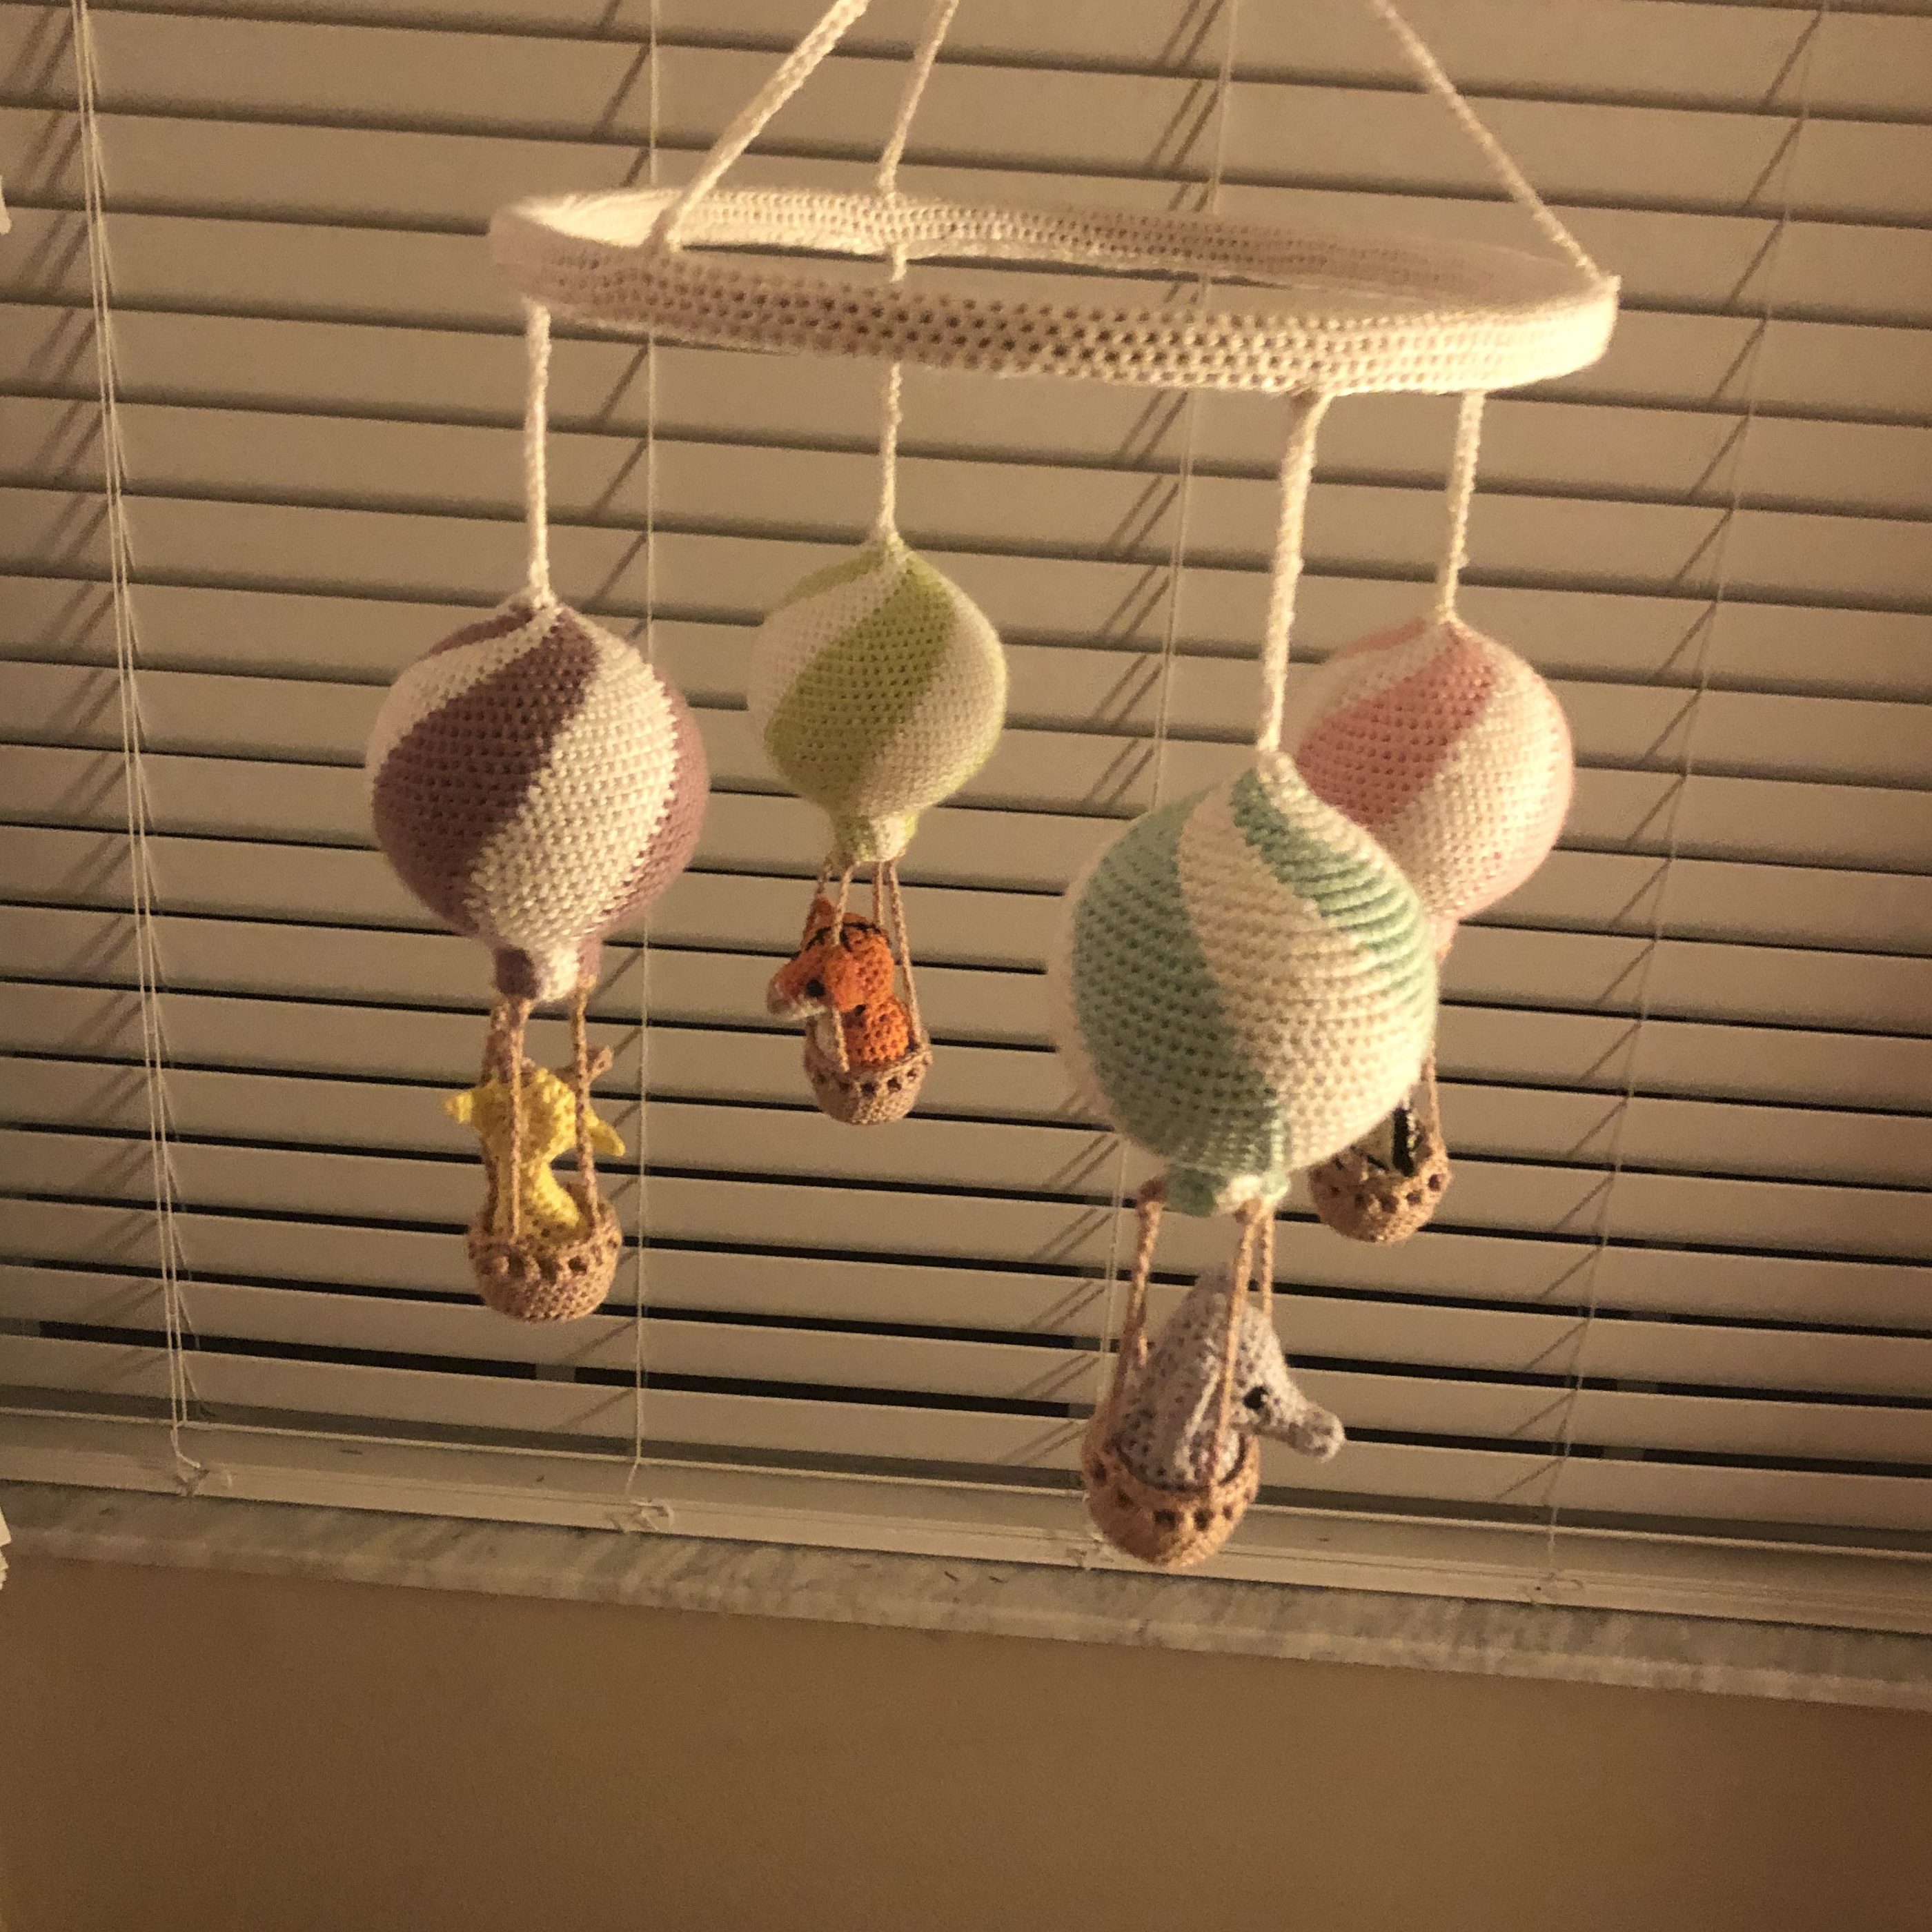
Balloons
The balloons are made up of two colors, using the tapestry method of crochet. If you’re not familiar with this technique you can learn more about it here, but basically the idea is that you crochet over-top of the yarn that’s not in use. This allows for quick and seamless color changes, and the end product results with minimal ends to weave in (hallelujah!).
I worked on the balloons in my free time, and I ended up making about one a week. The first half of the balloon works up pretty fast, but when it comes time to insert the styrofoam ball, your speed significantly slows down. Trying to crochet around the ball definitely gets a little awkward. Trying to hold onto it and maintain tension at the same time does not feel natural. Just be patient, and give yourself the grace to find a hand position that works for you. You will get the hang of it in no time!
My tip: My stitches started becoming a little tight, especially around the widest part of the ball, which resulted in being able to see the white of the Styrofoam through the yarn. If you think your stitches may be too tight to work around the ball I would recommend starting over on the balloon with a crochet hook that is one size larger.
Baskets
The baskets were pretty straightforward to make, however they can be tricky to attach! It’s really important to make sure that your tension and gauge are correct here, so that the four posts that will attach the balloon to the basket are the same length. One post that’s too long or short will tip the basket and make it off balance.

Animals
I really enjoyed making the animals. Each one is unique so it was fun playing with so many colors of yarn and watching them work up. All of the animals have a similar base, but different features, so it’s really cool watching them come to life as you add the little details.
However, sewing the pieces together and embroidering on the details can get a little overwhelming. If you find yourself becoming irritated because it feels like you’re working on a microscopic level, step back and take a deep breath. Walk away from the project for a little while, and come back to it when you’re feeling refreshed. It takes patience working with these tiny stitches!
Note: The faces on some of the animals made them a little bit front-heavy. Possibly adding some weight at the base with poly beads would help the animals to sit up straighter. If you do this, make sure that you fill a nylon sock or something similar with the beads before you stuff it. This could possibly be within reach of an infant, we don’t want any small pieces going rogue!
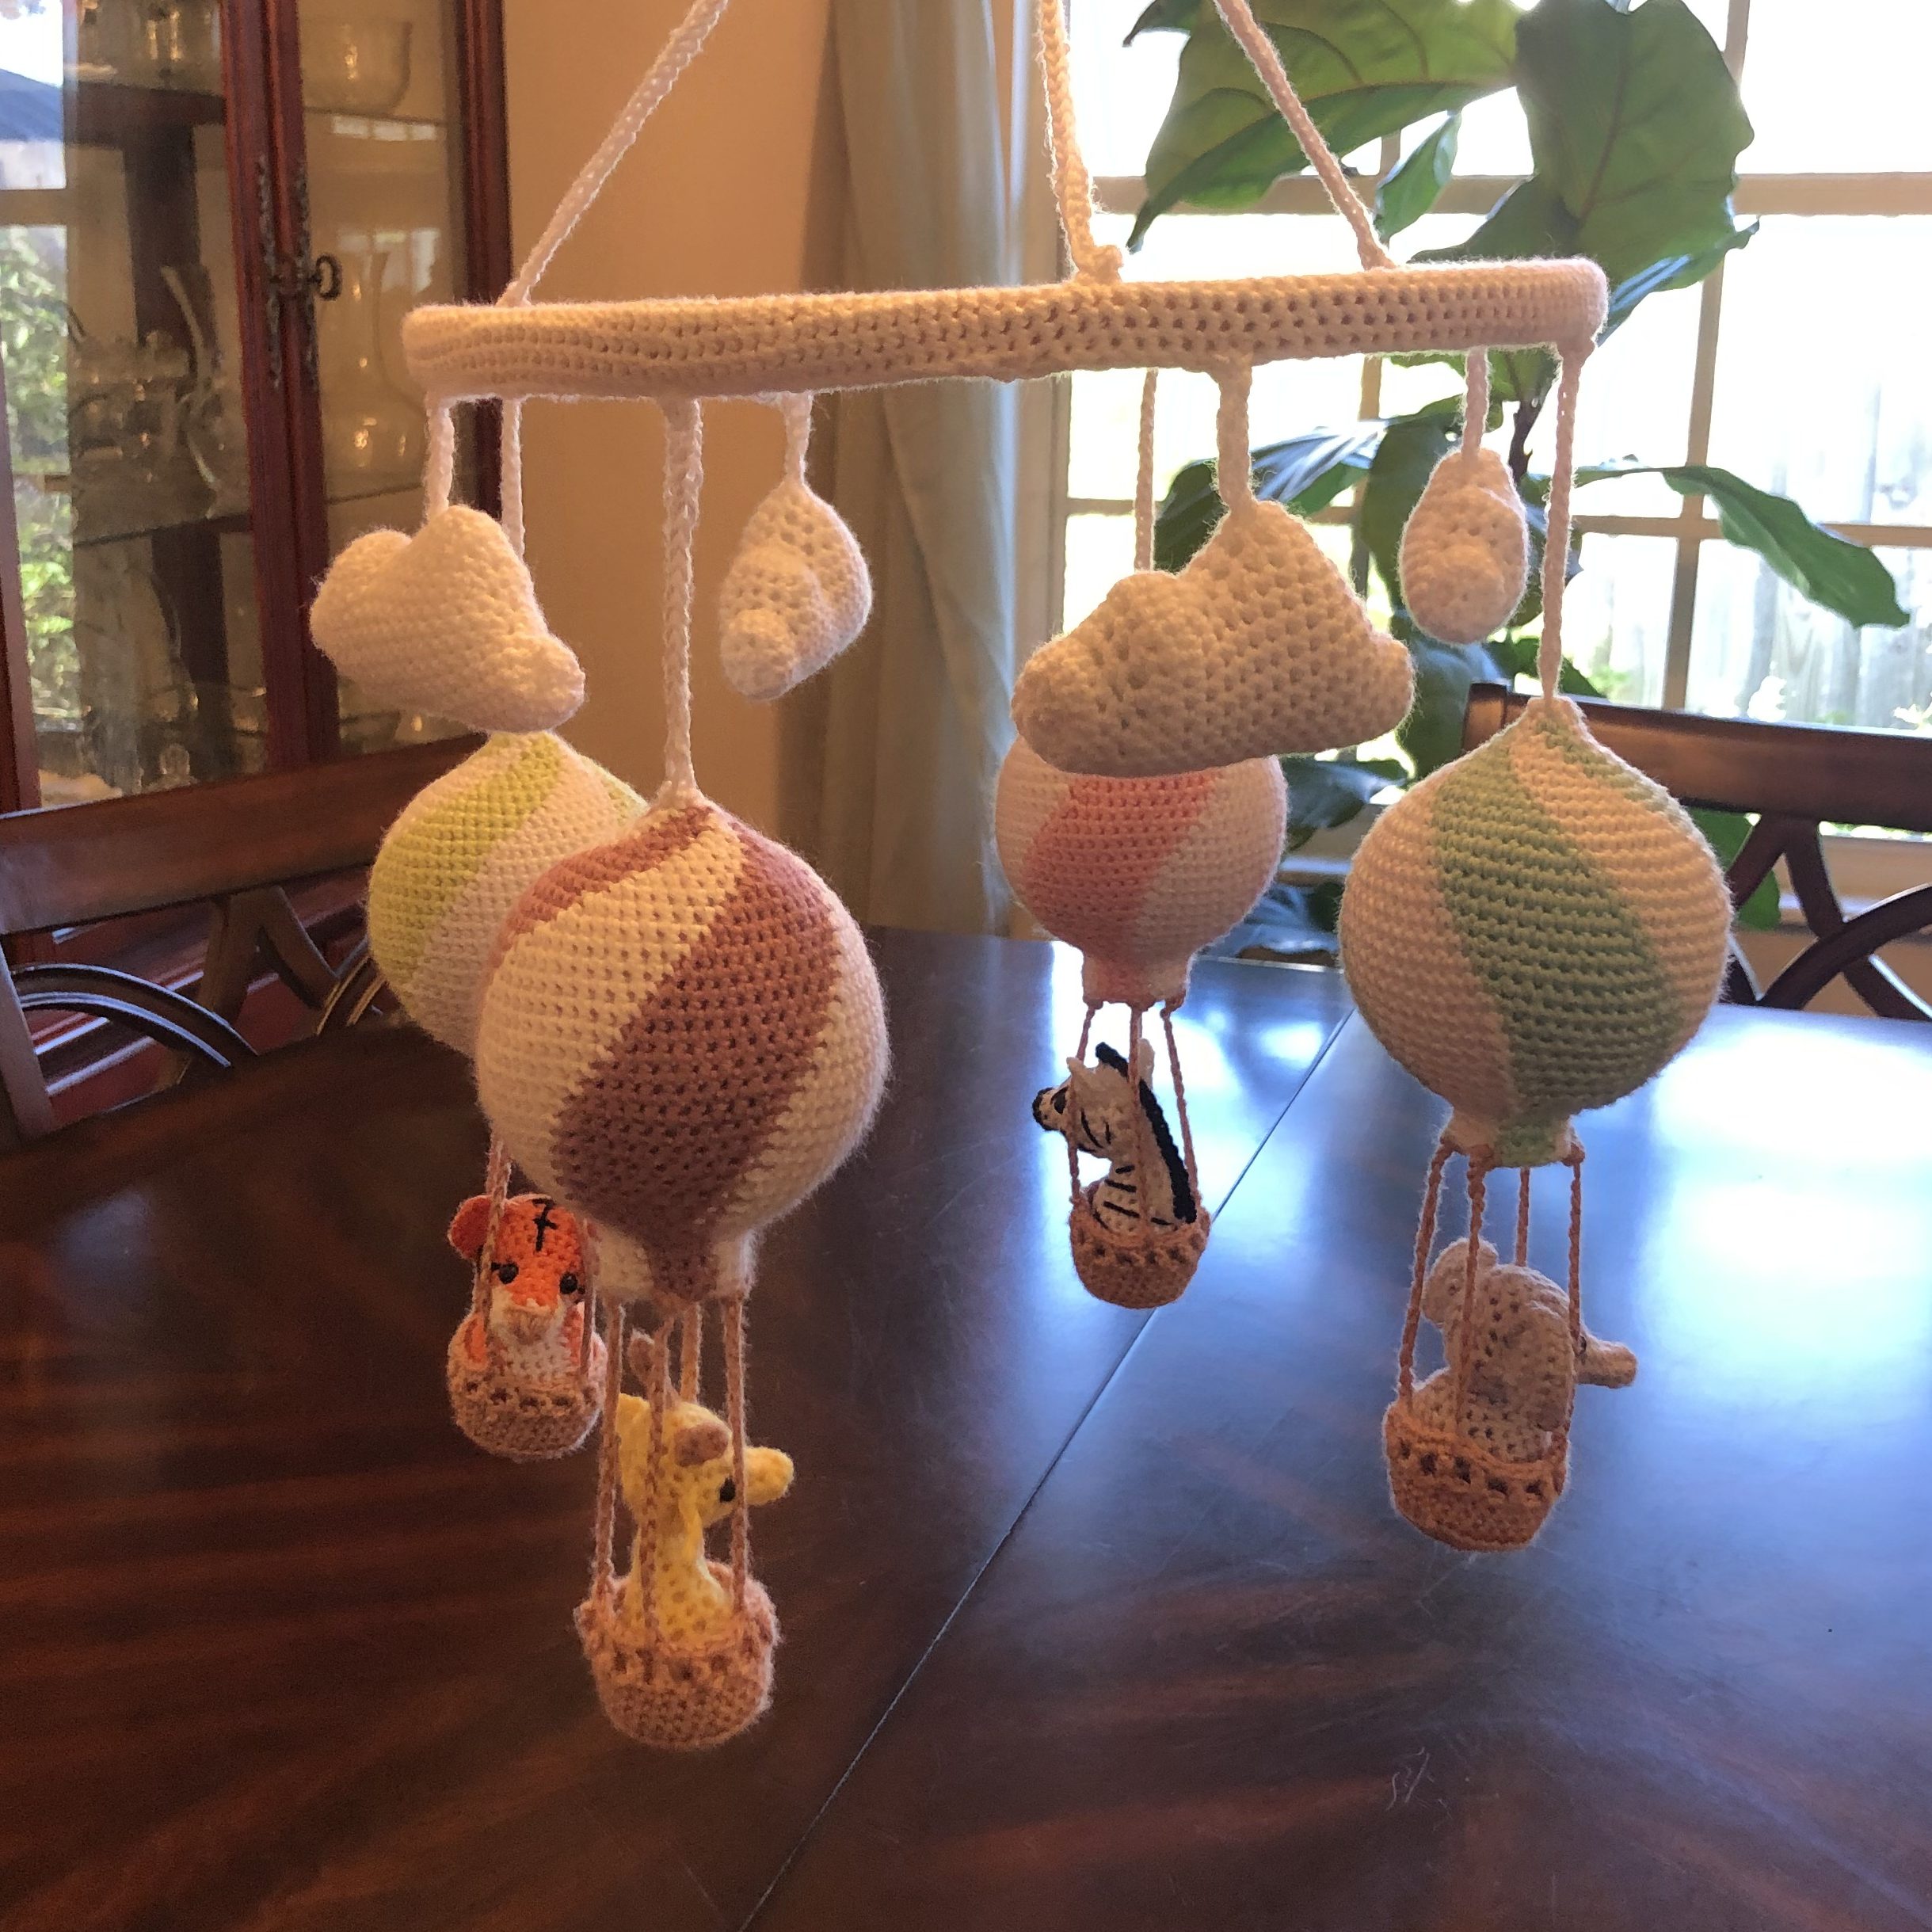
Frame & Assembly
No matter how hard I tried, I could not get a clean piece to fit around the mobile frame. Every time I tried to stitch it together it would slip, and my crochet rows went from nice and straight to being wavy. I will be making more mobiles in the future and I intend to practice that technique more, so that the end product will look a little more polished.
My biggest piece of advice? Create four support ropes instead of three. Like with the baskets, if one of your ropes is slightly too long or short, it is really difficult to get it to hang straight. Four support points will give you an easier time trying to find that balance.
Clouds & Finishing Touches
When I had finished with the pattern, I felt like something was missing. The mobile looked too plain, so I decided to up the whimsy factor and add in some clouds. I made four clouds, referencing this pattern, and hung them halfway between each balloon on the hoop.
I didn’t work on the mobile every day, but in total I spent about a month and a half on it. Towards the end of the project I worked on it a couple hours every day for a week.
I followed the pattern as described, with no alterations other than the addition of the clouds. I also starched a couple pieces on the animals to make them look polished and finished. You may want to do this too if you are having difficulty with certain pieces standing or curling up. The starch really helped with all of their ears, and the zebra’s mane.
Because I was giving this project as a gift I decided to put it on a wind-up motor so that mom-to-be could hang it up as soon as she got it. I went with this basic one from Amazon, which plays the song “Over the Rainbow.” It was truly the perfect finishing touch.
The Pattern
The pattern was available for purchase from the creator through Etsy. Currently, it doesn’t seem like she’s offering the complete pattern but she does have listings for the individual balloons & animals.
Birds and Crickets even has other variations of this pattern in their shop, like a version with llamas, an under the sea motif, and one with unicorns. Definitely make sure to check out their other crochet baby mobiles if you like this one!
Summary
This project offers a variety of different things to make and do, no getting bored! I really enjoyed creating it and watching it come together. I loved learning how to make the spiral pattern on the balloon. Every time you put a new row in, you feel yourself making progress because you see the pattern growing. Most of all though, I enjoyed giving this as a gift. Seeing my friend’s face light up when she saw it is what it’s all about.
If you are like me and you can’t have just one project going at once, this is a good one to make simultaneously with something else. You don’t quite get the meditative relaxation that comes with crochet when it comes to this project, so having something like an afghan or a scarf to work on when you need to zone out is a great idea.
Enjoy!
-Shelby
